The editorial team digs into the details behind every guide they put out, making sure the info is solid and useful. They’re the folks who keep the content sharp and trustworthy, so you get the real deal every time.
Understanding Fail2Ban and Its Role in SSH Security
Learning how to configure fail2ban on ubuntu server to block ssh brute force attacks is indispensable for any administrator who aims to safeguard system access from unauthorized intrusions. Fail2Ban is an open-source intrusion prevention software framework that monitors system logs for signs of repeated failed authentication attempts, a common method hackers use to gain illicit SSH access. Its core function is to automatically block IP addresses exhibiting hostile behavior, thereby minimizing potential breaches without requiring real-time human intervention.
SSH brute force attacks remain one of the most prevalent security threats for servers exposed to the internet. Attackers cycle through countless username and password combinations, hoping to exploit weak or default credentials. Without a protective layer like Fail2Ban, repeated attack attempts leave the server vulnerable to unauthorized access, data theft, or system compromise. Ubuntu Server, widely regarded for its stability and prominence in hosting environments, benefits majorly from this active defense mechanism, preventing attackers from overwhelming resources or exploiting login weaknesses.
Fail2Ban’s utility lies in its adaptable jail configuration system, which defines rules and responses for various monitored services. When set up for SSH protection, Fail2Ban examines authentication logs in real time, identifying patterns that indicate brute force attempts. Upon reaching a configurable threshold of failed login attempts, the system enforces bans at the firewall level, typically iptables or nftables, severing the attacker’s connection and blocking their IP for a defined period. This process is key for maintaining server integrity and reducing the risk surface against automated attacks.
Configuring Fail2Ban on Ubuntu Server typically involves several stages that are essential for effectiveness:
Installation of the Fail2Ban package from official repositories, ensuring compatibility and security patches.
Enabling and customizing the SSH jail configuration to specify failure thresholds, ban durations, and log file locations.
Setting up notification mechanisms to alert administrators when bans are activated or suspicious activity is detected.
Testing the configuration strictly to verify proper banning action without disrupting legitimate access.
Beyond blocking IPs, Fail2Ban helps maintain server logs by filtering noise from malicious attempts — invaluable for forensic investigations or compliance audits. Its event-driven architecture means minimal resource consumption, allowing servers to remain responsive under attack conditions. Also, integrating Fail2Ban with external alerting systems or centralized logging can improve overall security posture through prompt incident response.
Introduction to Fail2Ban and SSH Brute Force Attacks
Fail2Ban stands out as a lightweight, flexible, and powerful tool perfectly suited to Ubuntu Server environments, where SSH remains a primary access method. Its ability to dynamically respond to threats without manual oversight makes it indispensable for securing remote server access. System administrators focused on hardening their Ubuntu installations often incorporate Fail2Ban as a foundational measure, complementing other security proven methods covered extensively in guides on how to secure your Linux server and protecting critical infrastructure components. Effectively, understanding how to configure fail2ban on ubuntu server to block ssh brute force attempts is the first line of defense in a layered security strategy that reduces vulnerabilities and deters persistent threats.
The main points
Detailed Fail2Ban jail configuration examples for SSH
Step-by-step verification of Fail2Ban operation using log files
Troubleshooting common errors with Fail2Ban on Ubuntu
Advanced customization of banning actions and filters
Essential Prerequisites for Configuring Fail2Ban on Ubuntu Server
Ensure the Ubuntu Server version is 20.04 LTS or later, as Fail2Ban support and related packages are most stable in these releases.
Verify that OpenSSH server is installed and actively running to provide the SSH service Fail2Ban will monitor.
Obtain root or sudo-level permissions since installing packages and modifying Fail2Ban configuration files require improved privileges.
Confirm that the system’s software package list is up to date by running sudo apt update to avoid errors during Fail2Ban installation.
Have the Fail2Ban package available from the default Ubuntu repositories to guarantee compatibility and ease of updates.
Prepare the system to handle log file parsing by ensuring access to /var/log/auth.log, the default location for SSH authentication logs on Ubuntu.
Plan to create custom jails or modify existing ones inside Fail2Ban’s configuration directory, typically found at /etc/fail2ban/jail.d/ and /etc/fail2ban/jail.conf.
Back up any existing Fail2Ban configuration files before making changes to mitigate risks from misconfiguration.
Make sure the server firewall (iptables, ufw, or firewalld) is configured to allow SSH traffic, leaving room for Fail2Ban rules to interact effectively.
Familiarize yourself with basic command-line tools like systemctl for managing services and tail or grep for log inspection — vital for subsequent troubleshooting.
Ensure network monitoring tools or intrusion detection systems currently in place do not conflict with Fail2Ban’s IP blocking mechanisms.
Prepare to restart Fail2Ban and SSH services after configuration changes to apply new rules without disrupting existing sessions unnecessarily.
This preparation ensures a smoother rollout when you implement Fail2Ban as a deterrent against brute force SSH attempts, integrating well with your overall system security posture. The support for persistent log monitoring and IP management depends heavily on these setup steps being correct and complete. Administrators aiming to improve Ubuntu server defense will find that careful readiness dramatically reduces configuration time and runtime errors, aligning with established security protocols from Ubuntu’s official package management documentation.
Installing Fail2Ban on Ubuntu Server: A Step-by-Step Guide
Update the Package Index
Begin by updating your Ubuntu package list to ensure you install the most recent versions. Run sudo apt update to refresh the list of available packages and their versions — key for system stability and security.
Install Fail2Ban Package
Execute sudo apt install fail2ban to get Fail2Ban installed. This package includes daemon and client utilities necessary to manage banning IP addresses for SSH and other services.
Verify Installation
After installation, check Fail2Ban’s version using fail2ban-client --version. Confirming the installation succeeded prevents troubleshooting guessed on absent binaries or incomplete setups.
Enable Fail2Ban Service
Activate Fail2Ban to start on boot by running sudo systemctl enable fail2ban. This step ensures Fail2Ban persistently protects the server against brute force attacks following reboots without manual intervention.
Start the Fail2Ban Service
Initiate Fail2Ban immediately using sudo systemctl start fail2ban. This launches the protection service right away, allowing immediate mitigation against malicious login attempts.
Check Fail2Ban Status
Confirm Fail2Ban is running correctly with sudo systemctl status fail2ban. The output will indicate if the daemon is active or if any errors have occurred during startup, guiding early troubleshooting steps.
Backup Default Configuration File
Before customization, make a backup of the default jail configuration file by executing sudo cp /etc/fail2ban/jail.conf /etc/fail2ban/jail.local. This preserves a reference to the original settings to revert or compare against later if needed.
Create a Local Configuration File
Instead of editing jail.conf directly, create and edit jail.local using sudo nano /etc/fail2ban/jail.local. This practice prevents overwriting changes when the package updates, allowing safe and maintainable configuration adjustments.
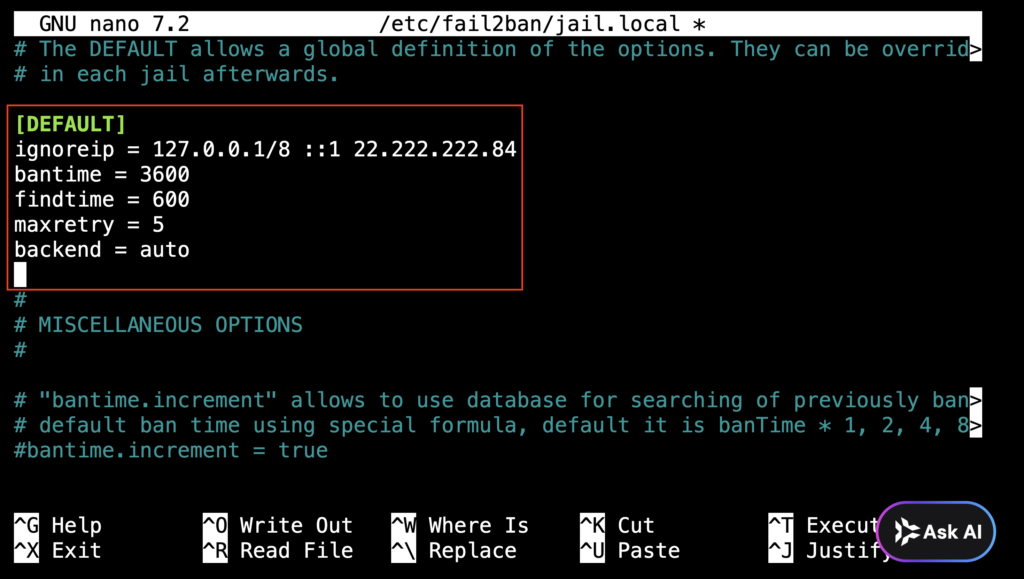
Configure Basic Jail Settings
Inside jail.local, set [DEFAULT] parameters such as bantime = 600 (10 minutes), findtime = 600, and maxretry = 5. These values define the ban duration, time window to count failures, and maximum allowed retries before banning, which balances security with user convenience.
Enable the SSH Jail
Find the [sshd] section and enable it by setting enabled = true. This activates Fail2Ban’s predefined filters for SSH brute force attacks, directly protecting one of the most targeted services on the server.
Set Log Path for SSH
Verify or set the logpath = /var/log/auth.log in the [sshd] jail configuration. Fail2Ban uses this log file to monitor authentication attempts — essential for detecting failures to trigger bans accurately.
Adjust the Action Setting
Choose an appropriate action like action = iptables-multiport[name=ssh, port="ssh"] for how banned IPs are handled. This instructs Fail2Ban to use iptables to reject malicious IPs on SSH ports, an effective firewall response that immediately cuts off harmful traffic.
Save and Exit Configuration
Once all changes are made in jail.local, save and close the editor. Configuration changes take effect only after restarting the Fail2Ban service to reload the updated rules.
Restart Fail2Ban Service to Apply Changes
Run sudo systemctl restart fail2ban to apply the new configuration. Restarting the service incorporates all custom rules and sets the server actively monitoring SSH login attempts under the specified parameters.
Test Fail2Ban Operation
Simulate failed SSH login attempts and then inspect the Fail2Ban log using sudo tail -f /var/log/fail2ban.log. Successful bans will record inserted firewall rules against offending IP addresses, confirming the setup operates correctly. Finally, mission accomplished.
This sequence ensures Fail2Ban is installed, configured, and running to effectively block brute force SSH attacks on Ubuntu Server. Proper implementation reduces the risk of unauthorized access substantially while maintaining system stability and manageability. Administrators can further tailor settings by adjusting the jail.local to fit specific security policies or server environments. Supplementing these steps with detailed log analysis, as outlined in later sections, will deepen monitoring and troubleshooting capabilities, securing the server against hostile access attempts more completely. For servers requiring hardened database security, integrating Fail2Ban with other Linux hardening practices complements a layered defense approach as detailed in how to harden mysql database on ubuntu server with new 2026 security steps.
The preceding guide provides full coverage of the installation phase—preparing the foundation for strong SSH brute force mitigation configuration in subsequent sections. The command structure and file handling follow proven methods established for Ubuntu systems in 2026, aligning with official security frameworks and community recommendations documented by established sources like the Ubuntu Security Team documentation.
Basic Configuration to Block SSH Brute Force
Begin by ensuring Fail2Ban is installed on the Ubuntu server to provide the essential framework for monitoring and blocking malicious login attempts. Use the command sudo apt-get install fail2ban to deploy the service, which uses log files for intrusion detection.
The default configuration file /etc/fail2ban/jail.conf should never be edited directly. Instead, create a copy named /etc/fail2ban/jail.local to preserve the original settings and avoid conflicts during updates. This allows safe customization of Fail2Ban’s behavior.
Within jail.local, locate the SSH section and set enabled = true. This activates monitoring of SSH login attempts specifically. SSH remains a primary target for brute force attacks, so enabling this jail focuses fail2ban’s defenses on this service.
Adjust the bantime parameter to define how long an IP address should be blocked upon detection. A common practice is to set bantime = 1h or longer, which deters persistent attackers by forcing them to wait before attempting again.
Use the maxretry parameter to specify the number of allowed failed SSH logins before an IP is banned. Setting maxretry = 3 or 5 strikes a balance between preventing attacks and allowing occasional user error.
The findtime parameter dictates over what span of time failed login attempts are counted. Setting this to 10m restricts the ban trigger to multiple failures within this period, tightening the reaction to rapid brute force sequences.
The ignoreip option lists IP addresses or ranges that will never be banned by Fail2Ban. Specify internal networks or known administrative IPs to avoid locking out legitimate users inadvertently.
Confirm that the logpath points to /var/log/auth.log, the main log file where Ubuntu records SSH login activity. Fail2Ban parses this file for matching failure patterns—accuracy here is key to effective blocking.
After saving jail.local, restart the Fail2Ban service using sudo systemctl restart fail2ban. This step activates the new SSH monitoring settings, ensuring Fail2Ban begins tracking failed logins immediately.
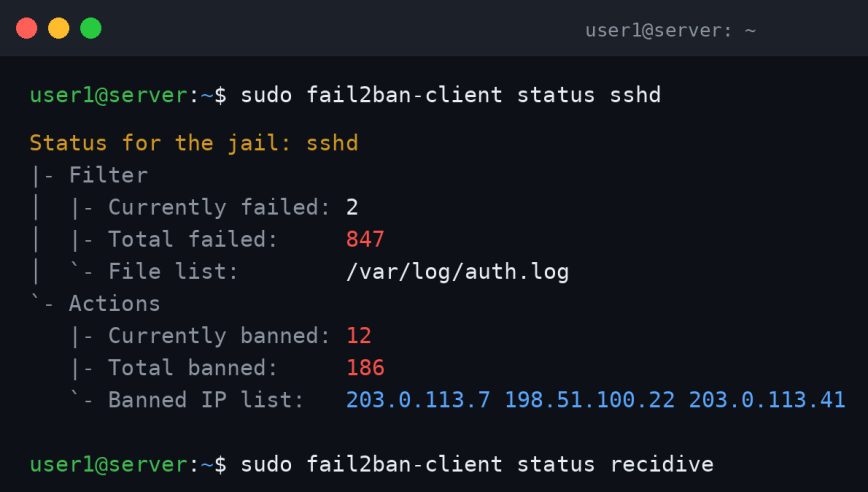
Execute sudo fail2ban-client status sshd to confirm the jail is active and view the number of currently banned IPs. This command helps administrators verify the effectiveness of the configuration and identify ongoing threats.
Fail2Ban uses filter definitions to recognize malicious patterns in logs. Located in /etc/fail2ban/filter.d/sshd.conf, filters can be adjusted to capture customized log formats or more advanced attack signatures on SSH attempts.
Configure Fail2Ban’s action settings in jail.local to send notifications upon banning an IP. This assists in real-time intrusion detection and audit logging, increasing situational awareness of potential security incidents.
Attempt several unsuccessful SSH logins from a different machine to verify that Fail2Ban triggers bans as expected. Monitoring the ban list ensures that the guardrails against SSH brute force are operational and precise.
Logs located at /var/log/fail2ban.log reveal detailed activity, including banned IP addresses and jail actions. Frequent review uncovers false positives or gaps that require tuning, keeping the defense mechanism sharp.
Use sudo systemctl enable fail2ban to ensure Fail2Ban launches after server restarts. Persistent protection guarantees no attack window forms due to downtime, cementing SSH security.
These steps collectively fortify SSH access on Ubuntu servers by intensifying resistance against brute force methods. Each configuration parameter must be chosen with operational context in mind to avoid unnecessary lockouts while blocking malicious entities effectively (among the platforms reviewed here). The ability to monitor, adjust, and validate settings helps administrators to maintain a resilient security posture without complexity or downtime. Further guidance on Linux server security practices complements this approach, offering a coherent defense framework for complete threat mitigation as detailed in Tested 2026 Methods Reveal How to Secure Your Linux Server Proven methods.
Verification and Testing of Fail2Ban Configuration
Confirm Fail2Ban Service Status
Start by verifying that the Fail2Ban service is active and running on your Ubuntu server. Use the command sudo systemctl status fail2ban to check its status; seeing “active (running)” confirms proper initialization, ensuring that Fail2Ban can begin monitoring SSH connections immediately.
Inspect SSH Jail Status
Next, assess the specific SSH jail to confirm it is enabled and operational. Running sudo fail2ban-client status sshd reveals the jail’s status, current banned IPs, and log path, directly indicating the scope of Fail2Ban’s engagement with SSH brute force events.
Review Fail2Ban Logs
Analyzing the log file /var/log/fail2ban.log provides detailed records of ban actions, unbans, and detected suspicious activity tied to the SSH service. Use sudo tail -f /var/log/fail2ban.log to monitor real-time Fail2Ban operations — key for validating expected behavior under threat conditions and troubleshooting anomalies with timestamped entries.
Examine System Authentication Logs
SSH attempts are logged in system files such as /var/log/auth.log. Running sudo grep sshd /var/log/auth.log extracts all SSH-related login attempts and failures, offering a cross-reference to Fail2Ban actions and ensuring that detected brute force attempts correspond to Fail2Ban bans.
Simulate Authentication Failures
Create controlled SSH login failures by attempting incorrect logins from a separate machine or through a local test user. Repeated invalid attempts trigger Fail2Ban conditions, allowing observation of ban enforcement and ensuring jail configurations actively respond to brute force attempts.
Test Fail2Ban Ban Command
Manually initiate an IP ban using sudo fail2ban-client set sshd banip to verify that Fail2Ban successfully adds the IP to the ban list. Confirm this ban appears when querying sudo fail2ban-client status sshd, validating the operational readiness of ban enforcement. Period.
Unban Test IP
After the manual ban test, remove the IP from the ban list with sudo fail2ban-client set sshd unbanip . This step confirms Fail2Ban’s ability to lift bans automatically or manually — key for normalizing access after incident resolution or error correction.
Configure Log Verbosity for Troubleshooting
If the standard logs are insufficient, increase Fail2Ban verbosity by adjusting /etc/fail2ban/fail2ban.conf’s loglevel to DEBUG. Restart the service to apply changes, enabling detailed recording of Fail2Ban’s decision-making process that assists in deep troubleshooting if the SSH jail fails to block brute force attempts as expected.
Verify IPTables Rules
Fail2Ban relies on IPTables to enforce bans. Check current IPTables rules with sudo iptables -L -n searching for chains related to Fail2Ban, typically named f2b-sshd. Presence of these chains demonstrates that Fail2Ban correctly installed firewall rules to block offending IPs, ensuring direct kernel-level blocking.
This thorough approach assures ongoing system integrity against SSH attack vectors, key in 2026’s evolving cybersecurity market documented in official security advisories like those available through the National Vulnerability Database. Accurate verification and testing make certain that Fail2Ban’s SSH protection is not only configured correctly but also actively mitigating brute force threats. For further defensive solidification, integrating Fail2Ban with broader server hardening strategies is advisable, as discussed in guides on hardening MySQL on Ubuntu Server and Linux multi-service security.
Troubleshooting Common Issues with Fail2Ban on Ubuntu Server for SSH Protection
Failure to Start Fail2Ban Service: One frequent problem is that the Fail2Ban service does not start or remains inactive after installation. Verify the service status using sudo systemctl status fail2ban. If inactive, check syntax errors in /etc/fail2ban/jail.local or other configuration files with fail2ban-client -d to enable debug output. Correct any misconfigurations, then reload the service using sudo systemctl restart fail2ban. Permissions issues on configuration files can also prevent startup; ensuring proper ownership and access rights is essential.
Ineffective SSH Jail Activation: Sometimes the SSH jail may not be active despite configuration changes. Confirm that the [sshd] section is enabled inside the jail configuration files, typically located at /etc/fail2ban/jail.local. Use the command fail2ban-client status sshd to review jail status. If the jail does not appear, ensure the configuration file does not have syntax errors and that Fail2Ban is reloaded to apply changes.
IP Not Being Banned After Multiple Failures: When brute force attempts continue without IP banning, checking logs is key. Review /var/log/auth.log (or the relevant SSH log file) to confirm that Fail2Ban successfully detects failed login attempts. If logs use a non-standard format, custom filters may be necessary. Adjust regex patterns in the filter file (/etc/fail2ban/filter.d/sshd.conf) to align with the log format, ensuring accurate parsing.
Misconfigured Ban Time or Max Retry Parameters: Default parameters for ban time (bantime) and maximum retries (maxretry) might not suit specific security needs. Improper settings can cause Fail2Ban either to ban IPs for too short or too long, or not at all. Edit /etc/fail2ban/jail.local to set appropriate values for bantime, findtime, and maxretry under the [sshd] jail, followed by restarting the service for changes to take effect.
Conflicts with Firewall Setup: Fail2Ban relies on the underlying firewall (typically UFW or iptables) to enforce bans. If the firewall is inactive or misconfigured, banned IP addresses will not be blocked effectively. Verify that UFW or iptables is running and configured to accept Fail2Ban rules. The command sudo ufw status verbose or sudo iptables -L helps confirm active rules.
Fail2Ban Not Monitoring Correct Log Files: Fail2Ban depends on monitoring accurate log files for SSH authentication events. Custom SSH configurations or unusual log paths require manual adjustment of the Fail2Ban jail configuration, specifically the logpath parameter. Validate that Fail2Ban’s logpath points to the correct SSH auth log for your Ubuntu version, which may differ in customized systems.
Excessive Ban Duration Causing Lockouts: Administrators sometimes unintentionally set very high ban durations. If a legitimate user gets locked out for extended periods, the ban configuration needs adjustment. Use the fail2ban-client set sshd unbanip command to manually remove bans during troubleshooting and tailor ban timings carefully in the configuration to balance security and usability.
Fail2Ban Overly Aggressive with False Positives: Certain automated system probes or unusual user behavior may cause Fail2Ban to block legitimate IPs. To mitigate false positives, customize the ignore IP list by modifying the ignoreip setting. Add trusted IP ranges, internal network addresses, or known safe hosts to this list to prevent accidental bans.
Fail2Ban Logs Lack Detail for Diagnosis: Insufficient logging impairs effective troubleshooting. Increase Fail2Ban’s log verbosity by editing the loglevel parameter in /etc/fail2ban/fail2ban.conf to DEBUG or INFO. This enables detailed output in /var/log/fail2ban.log, assisting in identifying parsing errors, jail activations, or banning actions.
Configuration Changes Not Taking Effect Immediately: After updating Fail2Ban settings, failure to restart or reload the service can delay propagating changes. Always execute sudo systemctl restart fail2ban or use fail2ban-client reload after editing any jail or filter file to ensure that modifications are applied promptly.
Incomplete Regex in Custom Filters: When customizing regex patterns for the SSH filter, errors can arise from incomplete or incorrect regex syntax. Validate new regex rules using tools like fail2ban-regex to simulate matching against sample log entries. This prevents silent failures in recognizing forbidden attempts.
Multiple SSH Servers or Ports in Use: If SSH runs on non-default ports or multiple instances exist, the default SSH jail may not suffice. Update the jail configuration with the appropriate port number under port and explicitly define the log path for each instance. This allows Fail2Ban to monitor all active SSH services properly.
Firewall Rules Not Persisting After Reboot: Some setups reset firewall configurations, causing Fail2Ban rules to be lost after server restarts. Ensure that firewall setup scripts are configured to load Fail2Ban rules on boot, or enable persistent firewall rule saving through UFW or iptables-persistent packages.
Each of these troubleshooting steps tackles specific scenarios encountered when setting up Fail2Ban for SSH brute force defense on Ubuntu. The process outlined here improves Fail2Ban’s capacity to respond accurately to SSH intrusion attempts, improving overall system integrity. Addressing these issues ensures a resilient security posture while maintaining legitimate user access. For deeper guidance on securing your Linux environment, reviewing a tested 2026 guide to securing Linux servers provides extensive context relating to complementary protective measures.
Proven methods for Strengthening SSH Security with Fail2Ban on Ubuntu Server
Protecting your Ubuntu Server from SSH brute force attempts is a foundational step in securing any Linux environment. Misconfigured or absent protections expose SSH to continuous attack vectors, risking unauthorized access and potential control over your system. Employing Fail2Ban correctly mitigates this threat by actively monitoring authentication logs and banning IP addresses exhibiting suspicious patterns.
Detailed parsing of /var/log/auth.log allows Fail2Ban to detect retry thresholds before initiating blocks, improving system responsiveness while maintaining security integrity. Ensuring you configure Fail2Ban’s SSH jail with precise filter definitions and appropriate ban policies reduces false positives that might disrupt legitimate users. Regularly reviewing these logs confirms the efficacy of your setup and reveals any attempts bypassed or system errors affecting the service.
To maintain best protection, administrators should:
Adjust ban times and retry limits based on the server’s usage pattern to balance security with user access needs.
Combine Fail2Ban with other hardening measures such as disabling root login over SSH, using key-based authentication, and enforcing strong password policies.
Consistent monitoring and tuning build a lasting defense against brute force attacks. These proven methods reflect tested recommendations supported by complete guides on Linux server security enhancements like those in Tested 2026 Methods Reveal How to Secure Your Linux Server Proven methods. The combination of proactive configurations and reactive blocking is a proven approach to securing SSH in 2026. For those managing multiple servers or demanding high availability, integrating centralized log management ensures swift identification and response to threat trends.
Fail2Ban’s core strength lies in its adaptability; administrators who refine its commissioning will find it indispensable. The precision offered by correctly setting up SSH jails limits attack surface and system resource consumption (among the platforms reviewed here). This approach is essential as brute force methodologies grow more advanced and persistent.

%22%2F%3E%3Cstop%20offset%3D%221%22%20stop-color%3D%22hsl(276%2C62%25%2C37%25)%22%2F%3E%3C%2FlinearGradient%3E%3C%2Fdefs%3E%3Ccircle%20cx%3D%2228%22%20cy%3D%2228%22%20r%3D%2228%22%20fill%3D%22url(%23g)%22%2F%3E%3Ctext%20x%3D%2228%22%20y%3D%2228%22%20font-family%3D%22Arial%2CHelvetica%2Csans-serif%22%20font-size%3D%2222%22%20font-weight%3D%22700%22%20fill%3D%22%23ffffff%22%20text-anchor%3D%22middle%22%20dominant-baseline%3D%22central%22%3EET%3C%2Ftext%3E%3C%2Fsvg%3E)